Starting the Emulator
An easy way to start the emulator is to run the ant solarium command in any Sun SPOT project folder that contains a build.xml file, such as the EmulatorDemo directory. The build.xml file contains the information to run the solarium target. On Windows the EmulatorDemo directory is installed under C:\Program Files\Sun\SunSPOT\sdk\Demos\EmulatorDemo by default.
cd SunSPOT/sdk/Demos/EmulatorDemo
ant solarium
After the ant command displays some initialization messages, and the Solarium window appears. By default the left side is a tree view, and the right side is a grid view.
(You can also start Solarium from SPOTManager. Click the Solarium tab, select Virtual Sun SPOTs in the drop-down menu, and click the Solarium button near the bottom.)
To create an emulated Sun SPOT: from the Emulator menu, choose New Virtual SPOT.
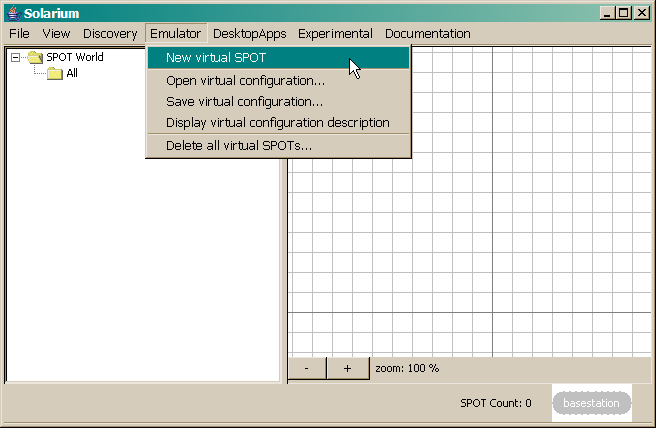
Emulated virtual Sun SPOTs appear in blue. Physical Sun SPOTs would appear in a photographic representation of their smoke-colored plastic case. You can move the Sun SPOT around the grid by dragging it with your mouse.
Blinking the LEDs
When the virtual Sun SPOT is created, it appears graphically in the grid view and textually in the tree view, by its name and address. Right click on it in the tree view, and from the pop-up menu choose Blink LEDs. In the grid view, the eight main LEDs on the Sun SPOT blink white ten times. The green and red activity LEDs at the bottom of the virtual Sun SPOT also blink ten times.
To the left of the activity LEDs is the control button. Click it with your mouse. If your sound system is enabled, you will hear a clicking noise.
Loading the JAR File
To load a Sun SPOT application, right click on the virtual Sun SPOT to pop up a menu, and select the first non-grayed choice, Deploy MIDlet Bundle.
A navigation window appears, titled "Choose application JAR or Ant build file." Locate the JAR (Java ARchive) file for the emulator demo. It should be in the SunSPOT/sdk/Demos/EmulatorDemo directory. Once you find emulator_demo.jar, double-click or select to open it. This loads the emulator demo into the virtual Sun SPOT.
Loading the build.xml file has a similar effect, but recompiles the Java source files and rebuilds the JAR file.
Running the Sawtooth Demo
Once the emulator demos are loaded into the virtual Sun SPOT, right click on it to pop up a menu, and choose Run MIDlet > Sawtooth. A MIDlet is the standard type of application that runs on a Sun SPOT. An applet is similar, but runs in a web browser. The Sun SPOT can run multiple MIDlets simultaneously.
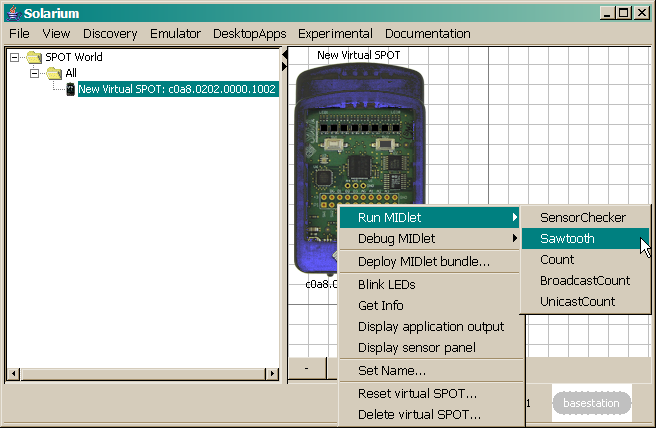
The Sawtooth demo illuminates the eight LEDs on the virtual Sun SPOT, creating increasingly bright levels of purple. Later in this tutorial, you will learn how to program a new color for the Sawtooth demo.
To exit this demo, right click the teal Sawtooth label and choose Exit.
Reset or Rename a Virtual Sun SPOT
If you have too many virtual Sun SPOTs, pick one to delete, right click on it, and from the menu choose Delete Virtual SPOT. Emulated Sun SPOTs are virtually deleted when you exit Solarium.
To get a Sun SPOT back to its defaults, and to undeploy a MIDlet bundle, right click on the Sun SPOT, and from the menu choose Reset Virtual SPOT.
To set the name of a physical Sun SPOT or a virtual Sun SPOT, right click on it, from the menu choose Set Name, and enter its new name.
For debugging or monitoring purposes, to display MIDlet messages, right click on the Sun SPOT, and from the menu choose Display Application Output.