In this module you learn how to modify Java source code by doing something simple: changing the LED color in the Sawtooth demo. An easy approach is to use the NetBeans IDE (integrated development environment).
For this tutorial we will use NetBeans 6.2, which is similar to earlier versions of NetBeans such as 6.0 or 5.5. Currently NetBeans 6 is packaged with some distributions of the Java SE SDK version 6. Alternatively, you can edit Java source code using a different IDE such as Eclipse.
Building Code with NetBeans
Before you begin, make sure the Solarium application is running. If it is not, start it up as follows:
cd SunSPOT/sdk/Demos/EmulatorDemo
ant solarium
Follow these steps to build and run the Sawtooth demo:
-
Run NetBeans by double-clicking its desktop icon,
or using your preferred start-up method.
The Sun SPOTs Info page might appear, if installed by the Sun SPOT SDK, with the normal NetBeans Welcome page in the tab underneath.
-
From the File menu, choose Open Project.
Enable the Open as Main Project option.
Then navigate to the SunSPOT/SDK/Demos/EmulatorDemo directory
and click the Open Project Folder button.
The EmulatorDemo project appears with a + expand mark in the upper left pane.
-
From the Build menu, choose Clean and Build Main Project.
(You can also right-click on the project and choose this option.)
Messages appear in the bottom window, indicating a successful build.
-
As you did earlier using ant,
run the Sawtooth demo in Solarium.
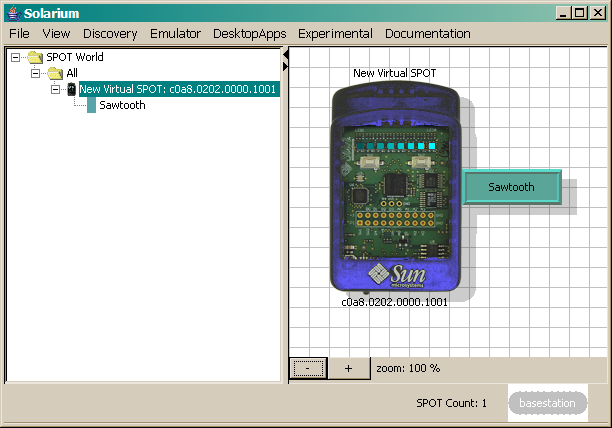
- From the Emulator menu, choose New Virtual SPOT.
- Right click on the blue virtual Sun SPOT. From the pop-up menu choose Deploy MIDlet Bundle.
- Navigate to SunSPOT/sdk/Demos/EmulatorDemo and open the emulator_demo.jar file.
- Right click on the blue virtual Sun SPOT. From the pop-up menu choose Run MIDlet > Sawtooth.
Note the purple LED color, increasingly bright from left to right.
Modifying Code with NetBeans
Follow these steps to modify and run the Sawtooth demo:
- Locate the LED color setting.
- Click the + mark to expand the EmulatorDemo project.
- Click the + mark underneath to expand the src code files.
- Click the next + mark to expand the org.sunspotworld modules.
- Double-click the Sawtooth.java module to select it and open the source code for it in the right pane.
The Java source code for the Sawtooth.java program appears in the right pane.
- Locate the startApp() method and find the call
to setRGB() in it.
This method takes three arguments to set the red, green and blue LED values. With setRGB(val, 0, val) the program sets equal red and blue values to form purple.
Click here to see a full-size screen capture of the NetBeans IDE.

-
Change the color to cyan by setting the green and blue values instead
with setRGB(0, val, val).
NetBeans underlines the line in wavy red until you correct the syntax.
-
From the File menu, choose Save.
This writes your changes to disk.
- Check that the code still compiles by right-clicking on the project and selecting the Build menu item.
-
In the emulator:
- Right click on the blue virtual Sun SPOT and from the pop-up menu choose Deploy MIDlet Bundle. If your virtual Sun SPOT was running an application, a dialog box appears asking you to confirm killing any running MIDlets; in this case, select Yes.
- Navigate to SunSPOT/sdk/Demos/EmulatorDemo and open the emulator_demo.jar file.
- Right click again on the blue virtual Sun SPOT and from the pop-up menu choose Run MIDlet > Sawtooth.
Now the LED color is cyan, increasingly bright from left to right.
If you have time, browse other portions of the EmulatorDemo code.
« Manipulating the Sensor PanelUsing Radio in the Emulator »