In this module, if you have real physical Sun SPOTs, you can see how they interact with virtual Sun SPOTs. If needed upgrade your physical Sun SPOTs so that they are running the latest SDK release. If you do not have any physical Sun SPOTs, you might want to read the introduction below and then skip ahead to the next module.
Connecting a Physical Basestation
The radio on each Sun SPOT allows it to communicate with other Sun SPOTs. The purpose of the Sun SPOT basestation is to allow applications running on your regular computer or laptop, such as Solarium, to interact with applications running on free-range Sun SPOTs.
A physical Sun SPOT basestation connects by USB port to your host computer, and by 802.15.4 radio to free-range Sun SPOTs. This design allows applications on the host to interact with applications on SPOTs.
The basestation can run in either dedicated mode or shared mode. In dedicated mode, the USB connection to the basestation SPOT is controlled by the Java virtual machine running the host application and is not accessible to other applications. In shared mode, one Java virtual machine manages the basestation while another runs the host application; the host application and basestation have separate addresses so radio communication requires two hops.
The advantage of shared mode is that more than one host application, including the Sun SPOT emulator, can simultaneously access the basestation. The disadvantage is that run-time manipulation of the basestation's radio channel, pan ID, and output power is not possible.
To enable shared basestation mode and allow interaction between virtual Sun SPOTs and physical Sun SPOTs, add the following line to the .sunspot.properties file in your home directory. On Windows, your home directory is probably located under C:\Documents and Settings.
basestation.shared=true
Now attach the basestation SPOT to a USB slot on your host computer and make sure it is running. The green LED on a running basestation blinks twice every 10-12 seconds. If your basestation is not running, start it by pushing the reset button.
Next power on one of your free-range Sun SPOTs by pushing its reset button. It does not matter what application it is currently running, because we can change it from Solarium. However it must have over-the-air (OTA) commands enabled.
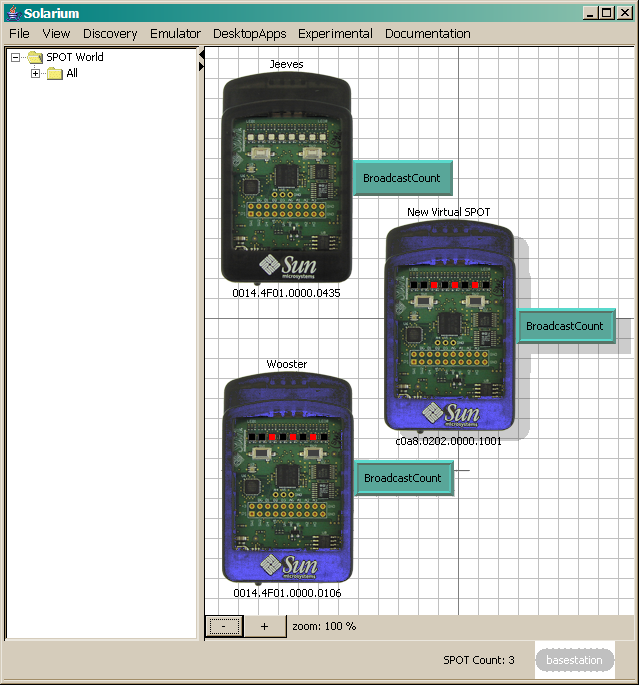
Finally restart Solarium using the ant solarium command. Because basestation sharing is now enabled you will see another window displayed by the shared basestation. After Solarium starts up it will use the basestation to broadcast a query to see what free-range Sun SPOTs are in radio range. You should see a picture of a black Sun SPOT appear in Solarium to represent your physical Sun SPOT. The name of whatever application it is running will be displayed to its right side.
Interacting by Radio with Virtual Sun SPOTs
Next you need to create two virtual Sun SPOTs so your physical Sun SPOT can to talk to them. From the Solarium menus, choose Emulator > New Virtual SPOT. Right click on the blue virtual Sun SPOT, choose Deploy MIDlet Bundle, and load the EmulatorDemo JAR file. Right click again and choose Run MIDlet > BroadcastCount. Do this twice.
Confirm that the virtual Sun SPOTs can talk to each other by clicking the left switch (SW1) with your mouse and noticing if the LEDs of the other virtual Sun SPOT change color.
Now load the EmulatorDemo onto your physical Sun SPOT. Right-click on the black Sun SPOT, and choose Deploy MIDlet Bundle. In the dialog box that pops up push the Choose... button and select the EmulatorDemo folder located in the Demos folder of your SDK. The second text field is set automatically based on the project's manifest file. You can change it if you wish. Press the Start button to build and deploy the EmulatorDemo to your physical Sun SPOT. A progress monitor dialog box appears to notify you that the application was successfully deployed.
Start up the demo on your SPOT by right clicking again on the black Sun SPOT, and choose Run > BroadcastCount. After a short pause, all LEDs on the hardware light up red, indicating that the BroadcastCount demo has started running. Note that the LEDs in the picture of your Sun SPOT as shown by Solarium do not light up, nor can you click on the switches with your mouse.
If you click on SW1 in either of your virtual Sun SPOTs, notice that both the LEDs of the other virtual Sun SPOT and your physical Sun SPOT change their color. Likewise if you push the SW1 switch button on your physical Sun SPOT, the LEDs of both virtual Sun SPOTs change color. This demonstrates the real and virtual Sun SPOTs can send radio messages to each other.
Note: if the initial application running on your physical Sun SPOT makes use of the LEDs, then it may interfere with the BroadcastCount demo. If this is the case then instead of using Run > BroadcastCount, select Run in Main Isolate and choose the BroadcastCount MIDlet. Respond Yes when asked if it is OK to reset the Sun SPOT. Whenever the Sun SPOT is restarted, it will now automatically run the BroadcastCount demo.